Posts tonen met het label Hobby. Alle posts tonen

woensdag 14 augustus 2013

"Das Verrückte Haus"

(Translation: The Crazy House)
If you are ever visiting northern Germany, and you are close to a town called 'Bispingen' (maybe because you're spending your vacation at Centerparcs 'Bispingerheide') be sure to bring your camera and visit "Das Verrückte Haus".

What's so crazy about this house is that it is turned upside down, including the interior! It's a unique opportunity to take some amazing pictures (without using photoshop or anything, well... maybe for rotating :-) ). The house is also tilted a few degrees, so you might experience a funny sensation in your tummy while walking there ;-)

It's not a place you will spend hours and hours of time, but is is a really nice visit, and you will end up with photo's that could look like these:


You can find more info on this website: http://www.dasverruecktehaus-bispingen.de/

And here's a short youtube entry about 'the making of': http://www.youtube.com/watch?v=KCBdOdjepHE


zondag 14 juli 2013

Light painting

The word "photography" means "light-drawing". In this blog we'll take a look at the literal translation of our favourite word: We are going to draw stuff with light!

To be able to do this, it needs to be dark. The darker the better. Also, we need to put the camera in manual mode. Next, dial in a slow shutter speed, like 15 or 20 seconds. If it's REALY dark you can even try 'bulb' mode, which means that the shutter will be open as long as you hold down the shutter release button (to avoid camera shake, better use a cheap cable release with which you you can 'lock' the release button).

Choose an ISO value which is not too high to avoid noise. The shutter will be open for a long time anyway so don't worry too much about not enough light falling into the camera.

Now choose an aperture that fits your needs. With a little bit of experimentation you'll get the correct setting. If the photo is too dark, just choose a lower f value to open the aperture some more. Too bright? Choose a higher f value to close the aperture.

You'll also need a light source of some kind. A flashlight or the led light on your phone will do perfectly fine. A model is not necessary, but it makes the photo's much more fun! (Don't forget to tell your model to stay perfectly still for as long as the shutter is open :-) ) And now for some examples:

f/22 t:20sec iso:1600
At the location of these poto's there was a lamp post pretty near by. Because of this, the guy with the light (that would be me) is visible as a ghost-like figure. This would not have been the case if the surrounding lights were less bright, and wearing darker clothes would help as well. In a more ideal (darker) situation we would have opened the shutter, made the light painting, and then use a seperate flash on the model to make him/her visible in the photo. But since this was not the case, we thought of another solution. First we made the desired photo, with me as the light ghost (especially visible at the 'k' position of 'Frank').
f/7.1 t:20 sec iso:200
After this, we made another photo with the same camera settings but without the people in it.
f/7.1 t:20 sec iso:200
Then, in Photoshop (any advanced photo editor will do) these two photo's were combined so that the ghost appearance was removed.
Combined image (also cropped)

The light paintings above were made with a little led light that was available on my phone. The downside of using a led/flashlight is that the person holding that light needs to be in the image. This might cause some ghosting if there is too much surrounding light. To avoid problems like that, you could also use a laser, as can be seen in the following examples:
f/3.5 t:10sec iso:320
f/3.5 t:10sec iso:125
Making light paintings is a lot of fun! Try different light sources like leds, lasers and flashlights. You could even attach them to a rope and swing them arround to create cool effects. I allready bought some glowsticks for the next session :-)

Here are some more, very cool, examples from a Finnish photographer called Janne Parviainen: http://9bytz.com/light-paintings-made-by-a-single-led/


zaterdag 13 juli 2013

The "StarBurst" effect

My God, It's full of stars! (Dave Bowman: 2001, A Space Odyssey)

While a large aperture gives you a small depth of field, a small aperture gives you a large depth of field, which means that more content in your photo is in focus. But there is also another effect that can be made to use when using a small aperture.

If you shoot a photo (about f16 and above), especially at night, with a light source in it, this light source will show up in the image as a star shaped light. It will also work with the sun during the day. However, the bigger the difference between the surrounding light and the light source in the photo (that should be brighter of course) , the better the effect. So if you want to use the sun for this, use it during a nice sunset.

Aperture: f29

Aperture: f22

Aperture: f22

vrijdag 17 mei 2013

Quality Photo Books

In this blog I want to discuss photo books, and one in particular, that can be ordered online. Unfortunately for some readers, these are books that can be ordered in the Netherlands. And although it may seem so, I am not sponsored by the mentioned book-provider.

In the past, I have tried out several online photo book 'providers'. Most of them deliver nice books, however, the quality of the photo's is not that great. Mostly your beautiful images get rasterized (so your sharp photo is now build up out of ugly visible coloured dots) and sometimes you can even see print-lines.
This is not why you have that nice expensive DSLR :-)

Thanks to a colleague, I discovered Top-Fotoalbum. They deliver fantastic quality books that have some great advantages, and they're not even that expensive!

First, and very important to me, the photo's are not rasterized and printed on real (heavy) photo paper. I will illustrate the difference with 2 examples.
Enlarged Top-Fotoalbum example, still looks good
The first picture is an enlarged scan of a Top-Fotoalbum photo book. There are no lines, dots or any other ugly artifacts visible. 'Real colours' are used during printing, just as you would expect.
Same enlargement as above, other book provider, looks terrible
The second picture (other provider) has the same size and the same magnification as the first example. However, it is nowhere near the same quality. The colours are build up from coloured dots, which is clearly visible, and even some printing lines can be seen here and there. This is not how I would like to see my images.

Other great advantages of Top-Fotoalbum are the hard cover, and the 'lay-flat' technique that is used with all available books. What 'Lay-flat' means is that no space is lost in the middle of the book. This creates the possibility to (for instance) put a panorama image spread over two pages without missing any part of the photo. This is what that looks like:
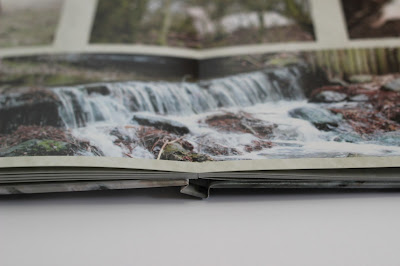
Lay-Flat technique so everything is visible, also in the middle

As with almost all photo book manufacturers, the provided software is very flexible. The photo books can be fully customized with layouts, backgrounds, text etc. etc.

So if you need a photo book, make sure you try this one out: http://www.top-fotoalbum.com/


woensdag 17 april 2013

Shooting waterfalls

Ever since I saw a YouTube video of Karl Taylor demonstrating the effect of slow shutter speeds on moving water, I am trying to find waterfalls and stuff like that. But since I am living in the Netherlands (not at the sea side), that's easier said than done.

T: 1/800 sec (Fast shutter speed, and it's a bit dark)
So I was pretty happy when we went for a small weekend-vacation to CenterParcs (only 25 minutes of driving from our home), where they seemed to have a few nice waterfalls to my surprise. Of course they were small, and man-made, but hey: good enough to do some experiments and take some nice photo's.

T: 4 sec (Slow shutter speed)
The beautiful thing about moving water is that you can 'freeze' it with your camera, using a fast shutter speed. But when you use a slow shutter speed, the water turns into 'mist', and with this effect some really nice images can be
created.

All photo's in this blog show the same waterfall which was the nicest around, and indoors. The first image of this blog was shot with a fast shutter speed of 1/800 sec. The water in this photo seems, more or less, frozen in time. All the drops that are falling down are visible.

The second photo was shot using a slow shutter speed of 4 sec. This time the moving water is blurred out and seems to have a mist-like quality. Personally this is my favourite way of shooting water.

I moved the camera around a bit, used the zoom lens, and made some more experimental shots. Here are some of my favourites. The first one is just to show what it looks like with a fast shutter speed:

T: 1/100 sec (fast shutter speed, but should have been even faster)

Same position, T: 4 sec, nice :-)

This is my favourite waterfall photo of that day. T: 5 sec


zaterdag 6 april 2013

Canon EF 50mm f/1.8 "Plastic Fantastic"

Canon EF 50mm f/1.8 II
The Canon EF 50mm f/1.8 II Lens is also known as the "Plastic Fantastic" or the "Nifty Fifty". It is a 50 mm prime lens, which means that it's 50 mm and that's it. There is no zoom or whatsoever.

The lens is very light, as its body is mainly made out of plastic and that's what makes this lens so cheap. It's available for around 100 Euro.

The best part is the light sensitivity. It's an f/1.8 lens so you get an enourmous amount of value for your money (Normaly, the more light sensitive a lens is, the more expensive it gets). This lens simply should be in every camera bag containing a Canon DSLR (Nikon also has an equivalent, which is just a bit more expensive if I'm not mistaken.)

Because of this light sensitivity factor, this lens can be used to shoot great photo's when there's not a lot of light to work with. But what's even better: you can make photo's with a very shallow depth of field. What this means is that you can make a photo of which only a very small area is in focus. Personally, I love these kind of images. It is a great way to draw the viewers attention to a certain part of the photo.

I could write much more about this fantastic piece of plastic, but a few examples probably say a lot more :-)

f/2.0
f/2.0
f/2.0
f/2.0


vrijdag 15 maart 2013

Flash experiments

External Flash, possibly even harder to use than a DSLR itself, at least if you want correctly lit photo's. Therefore it is wise to experiment with it as much as possible. To perform some experiments, I made a small Do-It-Yourself studio in the garage. For now, let's call it 'Studio Le Garage' :-)

Studio "Le Garage"
So what can we find in "Le Garage"? Of course we have a nice (cheap :-) ) tripod with the DSLR on top of it. On the right there is the flash on a not-so-professional stand, with on the floor a even less professional diffuser (an Ikea storage box). We also have a reflector (at the foot of the tripod in the photo) which is a piece of white foam board that I found in the back of a painting that we bought years ago (never throw anything away ;-) ) As a background I use a black piece of fabric that I bought for 2 Euro per meter at the market.
The flash is a Canon Speedlite 430EX II that is remotely triggered by the Canon 600D (wireless).

For my saturday morning experiment, I wanted to create some low-key (dark) photo's.

Experment 1
As a first flash experiment I made a self portret. A low key photo with some pretty harsh shadows. The flash was not on full power mode and not diffused. Also, no reflector was used to create fill light.

Experiment 2
For the second experiment, I diffused the flash using the Ikea-storage-box-diffuser. On the other side of my face I used the reflector which I held myself, just outside the frame. As you can see, the shadows are much softer.
Experiment 3
Next experiment: always nice to use a model so that more photo's can be made using different settings and setups. Unfortunately I only made a few photo's when the flash batteries went dead :-) For this photo, the same setup was used as experiment 2.

Experiment 4
This photo was not made in "Le Garage" but in the living room during a bright day! The background (just normal living room stuff) was darkened out by increasing the apperture (f/32) so that hardly any light reaches the sensor. The light that is vissible in the photo is created by the off camera flash. Using this method, low key photo's can be made without having a special dark background, everywhere and every time of the day.


donderdag 24 januari 2013

A new Hobby

In 2012, I decided it was time to start with a new fresh hobby. For a while already my interest shifted from video to photography, so I decided to buy a Canon  EOS 600D with the EF-S 18-55mm kitlens, and a small camera bag with room for an extra lens (from which I wasn't sure I would ever buy) or my Sony HDV camcorder. This all went fine for about 2 months, then the camera bag became too small! The first extra lens was the 'Plastic Fantastic' Canon EF 50mm f/1.8 II, and the second a nice Tamron 18-270mm f/3.5-6.3 Di II VC PZD. The 'old-new' camera bag had to make place for a bigger model, the Vanguard UP-Rise 43 Slingbag, which could hold my entire kit, including the camcorder... Until... Until I bought a Cokin filter set, and a Canon Speedlite 430 EX II. But that's ok if I leave the camcorder out of the equation, which is fine. So everything still fits... for now... :-)

Canon workshop

One of the things that 'excelerated' the 'photographic fire' was the 1-day digital photography workshop that Canon provided (for 25 Euro's) with the purchase of the camera. So I went to the 'FotoVakSchool' on a saturday and had a great time with some fellow enthusiasts (and all fresh owners of 1100D, 550D or 600D camera's). The (basic) in's and out's of the camera where explained in a very nice and understandable way. I can really recommend this workshop to anyone starting this great hobby! (But be prepared for the consequences ;-) )

Favourite Lens

My favourite lens at this time is definately the 50mm. You can create fantastic images with it with a very shallow depth of field, as shown in the image above in this post. The price is around 90 Euro's so anyone starting with a Canon dslr should buy it!

Purpose of this Blog

With this blog, I want to share my experiments and learnings in the field of photography. And hopefully it can be of some use to the starting DSLR user, like myself. Maybe we can even help each other out with burning questions!

Let's just see what happens :-)